Learn Couchbase Lite Batch operations with Kotlin and Jetpack Compose
- Learn how to use batch operations to add documents in Couchbase Lite
- Insert documents into the database in batch
- Use JSON to serialize objects in the database
- Explore the Visual Studio Code plug-in for Couchbase LIte
Introduction
In this part of the learning path, you will be working with the "Audit Inventory" demo app app that allows users to log in and access the developer screens in order to add 10 sample projects into the inventory database using batch operations. In this step of the learning path you will learn the fundamentals of:
- Inserting documents into the database in batch
- Using JSON serialization to serialize objects to be stored in the database
- Validating the documents were created
- Use the Visual Studio Code Couchbase Lite plug-in to review the documents added
App Overview
While the demo app has a lot of functionality, this step will walk you through:
- Log in into the application
- Accessing the Developer Screen
- Use the Load Sample Data button
- Review the project document count added
- Review the project documents added in the app
Installation
Fetching App Source Code
Clone Source Code
- If you haven't already cloned the repo from the previous steps, clone the
Learn Couchbase Lite with Kotlin and Jetpack Composerepository from GitHub.
git clone https://github.com/couchbase-examples/android-kotlin-cbl-learning-path.gitTry it out
- Open src/build.gradle using Android Studio.
- Build and run the project.
- Log in to the app with "demo@example.com" and "P@ssw0rd12" for user Id and password fields respectively.
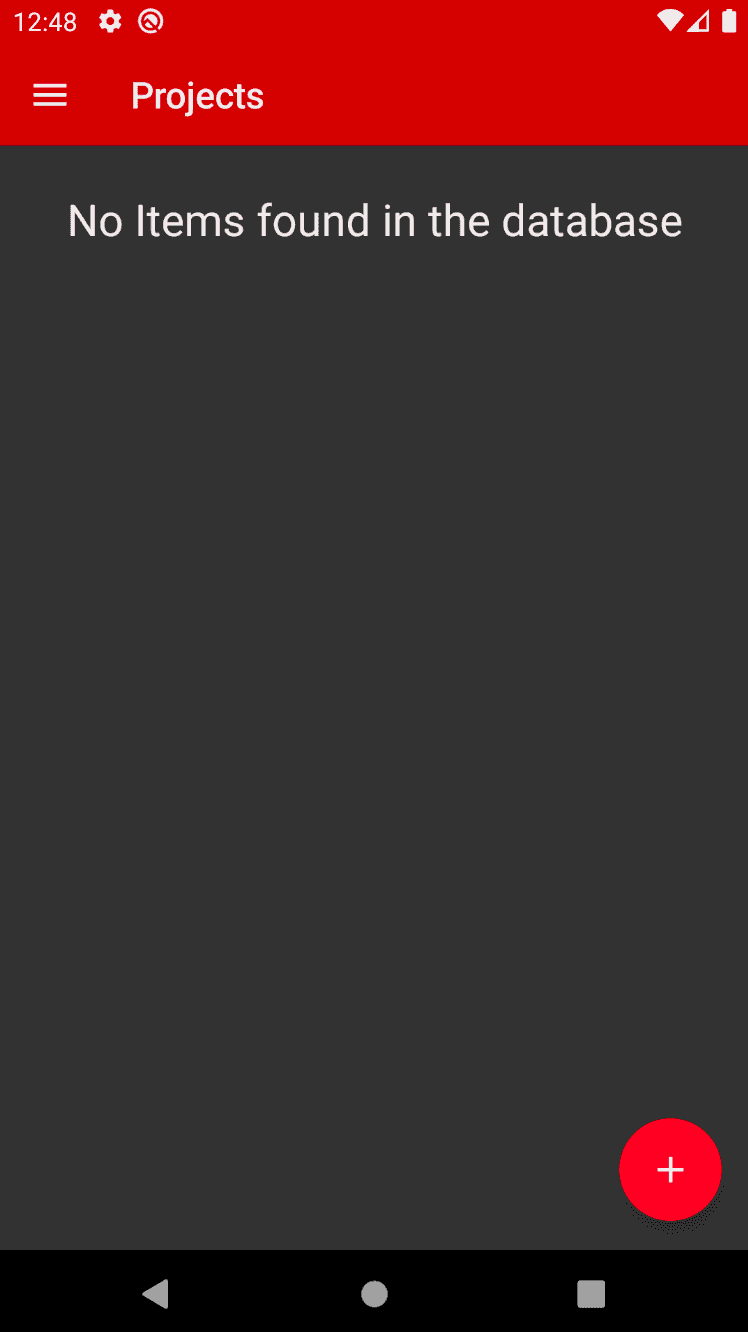
- Verify that you see the
No Items found in the databasemessage on the Projects screen.
Data Model
A reminder that Couchbase Lite is a JSON Document Store. A Document is a logical collection of named fields and values. The values are any valid JSON types. In addition to the standard JSON types, Couchbase Lite supports Date and Blob data types. While it is not required or enforced, it is a recommended practice to include a "documentType" property that can serve as a namespace for related documents.
The Project Document
In this step we will create a collection of Document with a "documentType" property of "project". Each document represents a project that a team would would work on and have to complete before the due date based on a selected warehouse, which is another document type.
An example of a document would be:
{
	"team": "team1",
	"modifiedOn": "1656804469897",
	"documentType": "project",
	"createdBy": "demo@example.com",
	"dueDate": "1734415200000",
	"name": "Santa Clara Warehouse Audit",
	"description": "Audit of warehouse stock located in Santa Clara, CA.",
	"modifiedBy": "demo@example.com",
	"warehouse": {
		"documentType": "warehouse",
		"name": "Santa Clara Warehouse",
   	"shippingTo": [
			"AZ",
			"CA",
			"HI",
			"NV"
		],
		"warehouseId": "e1839e0b-57a0-472c-b29d-8d57e256ef32",
		"city": "Santa Clara",
		"address1": "3250 Dr Olcott Street",
		"postalCode": "95054",
		"latitude": 32.3803024,
		"state": "CA",
		"salesTax": 0.0913,
		"longitude": -121.9674197,
		"yearToDateBalance": 0.0
	},
	"projectId": "663953ba-9e4c-4090-9e07-642c1778d467",
	"createdOn": "1656804469897"
}
The Project Data Class
When a "project" is retreived from the database it is stored within an data class of type Project.
@Keep
@Serializable
data class Project (
    var projectId: String = "",
    var name: String = "",
    var description: String = "",
    var isComplete: Boolean = false,
    var documentType: String = "",
    @Serializable(with = DateSerializer::class)
    var dueDate: Date? = null,
    var warehouse: Warehouse? = null,

    //security tracking
    var team: String = "",
    var createdBy: String = "",
    var modifiedBy: String = "",
    @Serializable(with = DateSerializer::class)
    var createdOn: Date? = null,
    @Serializable(with = DateSerializer::class)
    var modifiedOn: Date? = null
)
Serialization of Date/Time
Depending on the API versions of Android you want to support, you might find using Date and Time properties tricky. The default serialization library kotlinx.serialization does not have built-in support for serializing dates. To resolve this issue, you can build a custom serialization class to handle Date/Time serialization. The DateSerializer.kt file found in the util folder provides the basic foundation for serialization that will work with this project. When reviewing the Project Data Class above you will note we annotated various properties that use the DateSeralizer to convert the Date to a value that is friendly with JSON formatting.
NOTE: If you are syncing information from Couchbase Lite to Sync Gateway to be used with other platforms and languages, it's best to choose a seralization format that will work with all the various languages and platforms your data is viewed on. The included implementation for Date and Time does not represent a format that necessarily works well with all platforms; it's included in the provided format for the sake of simplicity.
The Warehouse Class
When a "warehouse" from a project is retreived from the database it is stored within a data class of type Warehouse.
@Keep
@Serializable
data class Warehouse(
    val warehouseId: String,
    val name: String,
    val address1: String,
    val address2: String? = "",
    val city: String,
    val state: String,
    val postalCode: String,
    val salesTax: Double,
    val yearToDateBalance: Double,
    val latitude: Double,
    val longitude: Double,
    val documentType: String,
    val shippingTo: List<String>,
    )
The StockItem Data Class
When a "item" is retreived from the database it is stored within an Data Class of type StockItem.
data class StockItem (
    var itemId: String = "",
    var name: String = "",
    var price: Float,
    var description: String = "",
    var style: String = "",
    var documentType: String = "item")
Batch operations
If you’re making multiple changes to a database at once, it’s faster to group them together. Batch operations are still transactional: no other Database instance, including ones managed by the replicator can make changes during the execution of the block of code running the batch operation, and other instances will not see partial changes. Batch operations can be very useful for loading data quickly and we will use them to load some random sample data into the database.
Triggering the loading of Sample Data
To load sample data a user would
- Log in to the app with any email Id and password.
- Tap the Drawer menu icon found in the upper left hand corner of the screen
- Tap the Developer menu item
- Tap the Load Sample Data button
Loading the Sample Data - View and ViewModel
To review the entire process, let's start by opening the DeveloperView.kt file and locate the DeveloperWidget function. This function defines the button and calls the passed in loadSampleData function when the onClick event is called.
Button(
  modifier = Modifier
    .padding(top = 32.dp)
    .semantics { contentDescription = "load_sample_data" },
 colors = ButtonDefaults.buttonColors(backgroundColor = Red500),
 onClick = {
   onLoadSampleData() //call function to load sample data
 }){
   Text(
     "Load Sample Data",
     style = MaterialTheme.typography.h5,
     color = Color.White)
  }
The DeveloperWidget function is called by the DeveloperView function and passes the OnLoadSampleData function from the DeveloperViewModel.
DeveloperWidget(
  toastMessage = viewModel.toastMessage.value,
  onLoadSampleData = viewModel.onLoadSampleData,  //use this with button to load sample data
  clearToastMessage = viewModel.clearToastMessage,
  navigateToDatabaseInfoView = navigateToDatabaseInfoView
)- Now open the DeveloperViewModel.kt file and locate the
onLoadSampleData()definition.
val onLoadSampleData: () -> Unit = {
  viewModelScope.launch(Dispatchers.IO){  // <1>
    projectRepository.loadSampleData()  // <2>
    toastMessage.value = "Load Sample Data Completed"
  }
}- This will use the launch lamda using the dispatcher Dispatcher.IO using the scope viewModelScope, which should always be used for disk or network related calls.
- This will call the project repositories loadSampleData function
Loading the Sample Data - ProjectRepositoryDb
Now that it's clear how the UI and ViewModel interact with the repository, open the ProjectRepositoryDb.kt file and locate the loadSampleData function. You can see by the method signature that it's using suspend, which is part of the Kotlin Co-Routine library. By using the Co-Routine library properly, we keep database operations off the main UI thread.
override suspend fun loadSampleData() {- First, we define the context of which the suspend function should run, which is Dispatcher.IO.
return withContext(Dispatchers.IO) {- Next we need to define some services and data we will use to generate the random data required.
val currentUser = authenticationService.getCurrentUser() // <1>
val warehouses = warehouseRepository.get()  // <2>
val warehouseCount = warehouses.count() - 1  // <3>
val stockItems = stockItemRepository.get()   // <4>
val stockItemsCount = stockItems.count() - 1 // <5>- Retreive the current logged in user that will be set to the projects createdBy and modifiedBy fields, along with which team the project is assigned to.
- Use the warehouse repository to get a collection of warehouses. This is using the pre-built database that was discussed in the previous part of this learning path.
- Get the count of how many warehouses are in the collection
- Use the stock item repository to get a collection of stock items. This is using the pre-built database that was discussed in the previous part of this learning path.
- Get the count of how many stock items are in the collection - this is used in the random function to get a random stock item
- Next we get a reference to the inventoryDatabase from the DatabaseManager using the getInstance function an passing in the context. Since the database could be null, we use a lamdba to unbox it using the kotlin let keyword.
val db = DatabaseManager.getInstance(context).inventoryDatabase
db?.let { database ->- Finally, we use the database.inBatch function to define a UnitOfWork to add in our random projects to the database using a JSON formatted string by encoding our Project object using the standard Kotlin JSON encoding library.
database.inBatch(UnitOfWork {   // <1>
 for (count in 0..11) {      // <2>
  val projectId = UUID.randomUUID().toString()
  val warehouse = warehouses[count] // <3>

  val document = Project(  // <4>
   projectId = projectId,
   name = "${warehouse.name} Audit",
   description = "Audit of warehouse stock located in ${warehouse.city}, ${warehouse.state}.",
   isComplete = false,
   documentType = projectDocumentType,
   dueDate = SimpleDateFormat(
    "MM-dd-yyyy",
     Locale.US
   ).parse("${(1..12).random()}-${(1..27).random()}-${(2022..2024).random()}"),
   team = currentUser.team,
   createdBy = currentUser.username,
   modifiedBy = currentUser.username,
   createdOn = Date(),
   modifiedOn = Date(),
   warehouse = warehouses[count]
  )
  val json = Json.encodeToString(document) // <5>
  val doc = MutableDocument(document.projectId, json) // <6>
  database.save(doc) // <7>

      //create random audit items per project // <8>
      for (auditCount in 1..50){
          val stockItem = stockItems[(0..stockItemsCount).random()]
          val auditDocument = Audit(
              auditId = UUID.randomUUID().toString(),
              projectId = projectId,
              count = (1..100000).random(),
              stockItem =  stockItem,
              documentType = auditDocumentType,
              notes = "Found item ${stockItem.name} - ${stockItem.description} in warehouse",
              team = currentUser.team,
              createdBy = currentUser.username,
              modifiedBy = currentUser.username,
              createdOn = Date(),
              modifiedOn = Date()
          )
          val auditJson = Json.encodeToString(auditDocument)
          val auditDoc = MutableDocument(auditDocument.auditId, auditJson)
          database.save(auditDoc)
      }
  }
})- Call the database inBatch function and pass in a UnitOfWork which is a definition of processing multiple documents to be added to the database.
- Define a loop to add in 12 new project documents to the database in our UnitOfWork
- Get the warehouse to use in the project document from the collection of warehouses
- Create a new Project object with random data and the warehouse from step 3
- Convert the Project object to a JSON string using the Kotlin serialization library
- Create a new MutableDocument using the projectId for the Id and the JSON string for the document's content
- Save the document to the database
- Repeat same sort of steps for creating random audit items for each project
NOTE: In this example we are using JSON strings to create a MutableDocument and then save it to the database. This is an alternative API to using a HashMap as we did in the key value part of our learning path. Developers that are used to working with JSON encoding and decoding might find this pattern more comfortable to save data to the database.
Try It Out
- The app should be running in the emulator.
- Log in to the app with any email Id and password. Let's use the values "demo@example.com" and "P@ssw0rd12" for user Id and password fields respectively. If this is the first time that any user is signing in to the app, the pre-built database will be loaded from the App Bundle. In addition, a new team-specific Database will be created / opened.
- Tap the Drawer menu icon found in the upper left hand corner of the screen
- Tap the Developer menu item
- Tap the Load Sample Data button
- Tap the Drawer menu icon found in the upper left hand corner of the screen
- Tap the Home menu item
You should now see 12 sample projects that you can scroll through.
Review Data with Visual Studio Code Plug-in
Visual Studio Code has a plug-in for Couchbase Lite that allows you to open and review documents in a database. This is useful for debugging and testing your app. To download Visual Studio Code, follow the link here.
Save files to folder on your computer from emulator
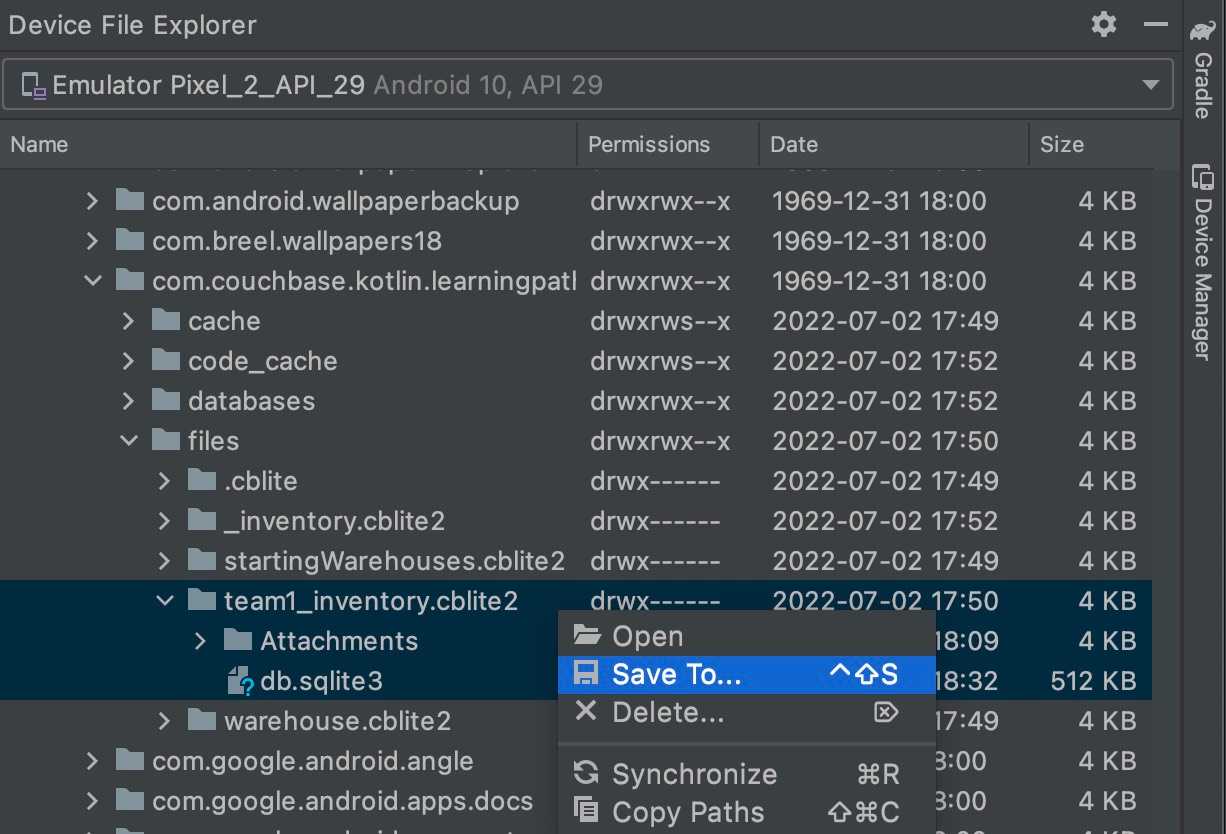
To open the database, we must first copy it from the Emulator to our local computer. To this open Device File Explorer in Android and browse to the local of our applications files folder as shown above. Once in the directory, locate the directory team1_inventory.cblite2 directory an open it to show all the files in it. Select all the files and right click and select Save As from the pop-up menu and save the files to a location on your computer that you can access which we will use in the next step.
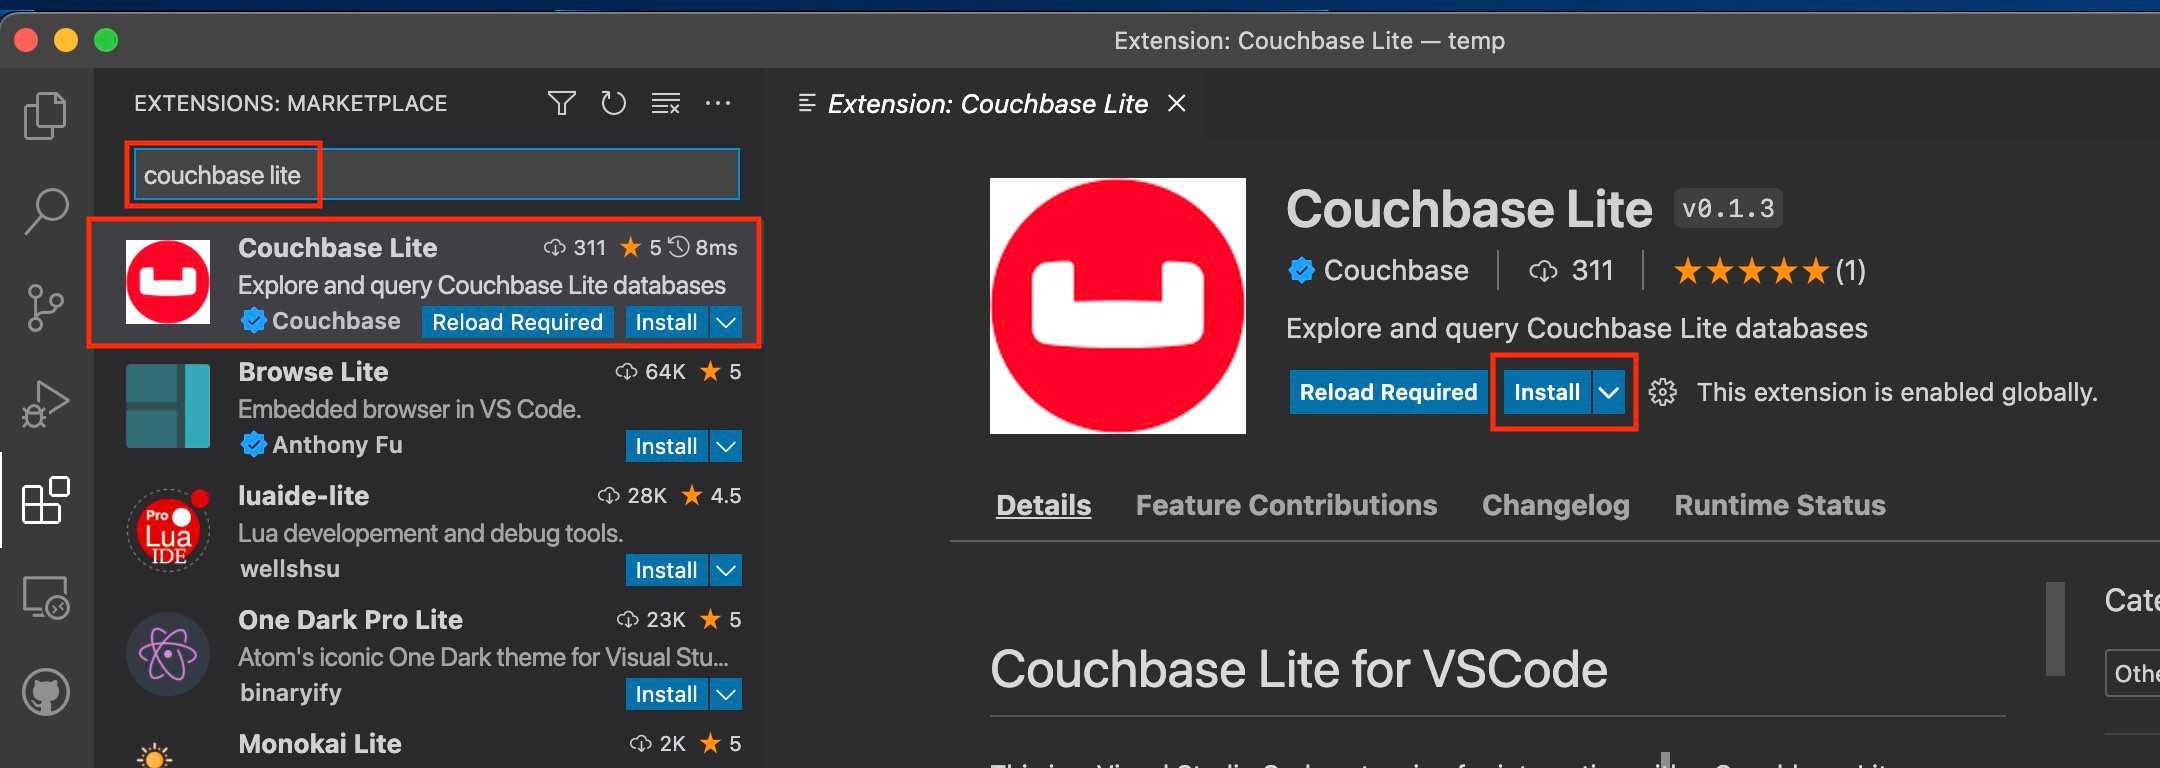
Install Coucbase Lite Plug-in in Visual Studio Code
Open Visual Studio Code and select the Extensions icon from the menu. In the search box type "Couchbase Lite" and hit enter. Select the Couchbase Lite listing and click the Install button.
Open the database in Visual Studio Code
With Visual Studio Code open click File and select Open Folder. Browse to the folder you saved the database files in and click Open. Now select the team1_inventory.cblite2 folder and right click on it and select Open Database. You should get a new option listed in your file browser called CBLITE EXPLORER in Visual Studio Code. When opening this section you should now see your database and you can see a listing of files. If you click the chevron by each file listing you can get a listing of fields in the document. To open the document, right click on the document name and select "Get Document".
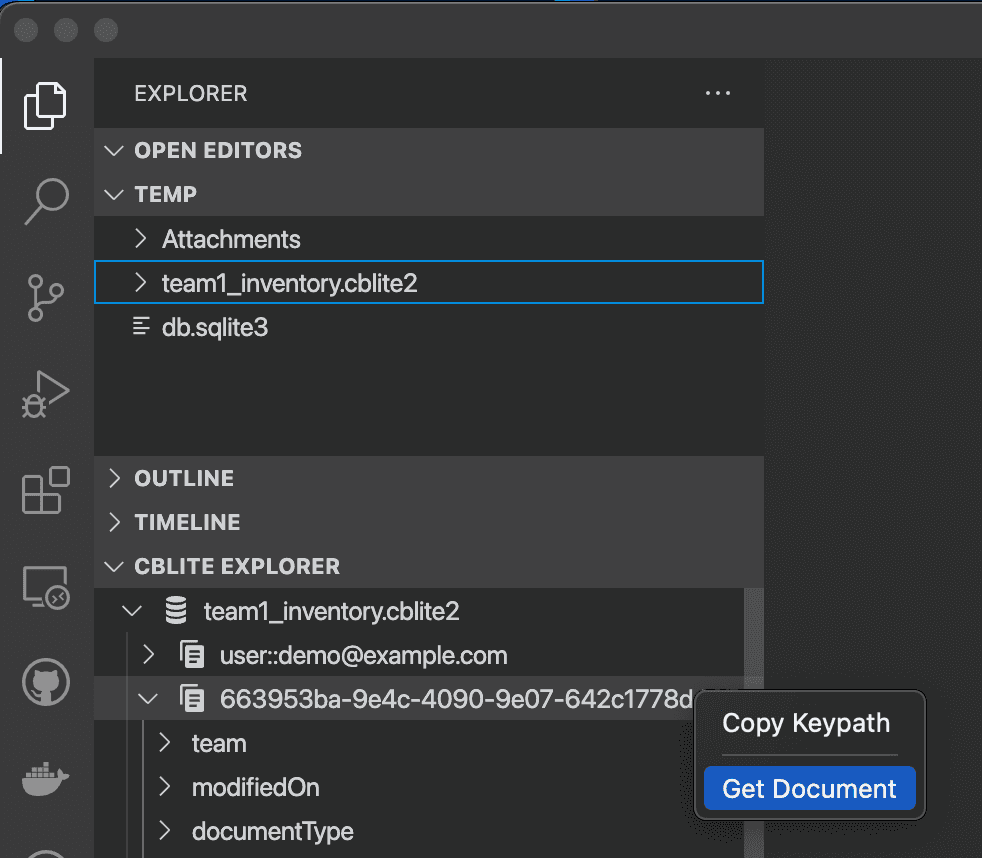
The document show open in the text editor. To format the document select View and select Command Palette. In the box that opens type in "Format Document". Select the Format Document option that appears.

This will format the document to make it easier to read. You can now scroll through the document and review the data.
Learn More
Congratulations on completing this step of our learning path!
This step of the learning path walked you through an example of how to use the in batch operations to add 10 sample projects to a Couchbase Lite database. Check out the following links for further documenation and continue on to the next step to learn more about how to use Query Builder to render the project listing screen.