Quickstart in Couchbase Lite Data Sync with iOS, Swift, and UIKit
- Build an iOS App that uses Data Sync in Swift with Couchbase Lite
- Learn how you can sync your data across devices and to the cloud with Sync Gateway
- Gain experience working with channels in Sync Gateway
Introduction
Couchbase Sync Gateway is a key component of the Couchbase Mobile stack. It is an Internet-facing synchronization mechanism that securely syncs data across devices as well as between devices and the cloud. Couchbase Mobile uses a websocket based replication protocol.
The core functions of the Sync Gateway include
- Data Synchronization across devices and the cloud
- Authorization & Access Control
- Data Validation
This tutorial will demonstrate how to -
- Installing Couchbase Server using Docker and Docker Compose
- Automation of Couchbase Server cluster setup and importing of data
- Installing Sync Gateway using Docker and Docker Compose
- Setup of a Sync Gateway configuration file
- Configure your Couchbase Lite clients for replication with the Sync Gateway
- Use "Live Queries" or Query events within your Couchbase Lite clients to be asynchronously notified of changes
We will be using a Swift App as an example of a Couchbase Lite enabled client.
You can learn more about the Sync Gateway here in the Sync Gateway Documentation.
Prerequisites
This tutorial assumes familiarity with building swift apps with Xcode and with Couchbase Lite.
-
If you are unfamiliar with the basics of Couchbase Lite, it is recommended that you walk through the following tutorials
- Fundamentals of using Couchbase Lite as a standalone database - see Quickstart in Couchbase Lite with iOS, Swift, and UIKit
- Query Basics with a prebuilt version of Couchbase Lite database - see Quickstart in Couchbase Lite Query with iOS, Swift, and UIKit
-
iOS (Xcode 14/15) - Download latest version from the Mac App Store or via Xcodes
Note: If you are using an older version of Xcode, which you need to retain for other development needs, make a copy of your existing version of Xcode and install the latest Xcode version. That way you can have multiple versions of Xcode on your Mac. More information can be found in Apple's Developer Documentation. The open source Xcodes project makes managing multiple installations of Xcode easier.
-
curl HTTP client
- You could use any HTTP client of your choice. But we will use curl in our tutorial. Package manager users can use homebrew.
-
Docker
- We will be using Docker to run images of both Couchbase Server and the Sync Gateway — to download Docker, or for more information, see: Get Docker.
System Overview
We will be working with a simple "User Profile" app which we introduced in the Quickstart in Couchbase Lite with iOS, Swift, and UIKit tutorial and extended in the Quickstart in Couchbase Lite Query with iOS, Swift, and UIKit tutorial.
In this tutorial, we will be extending that app to support data sync.
The app does the following
-
Allows users to log in and create or update his/her user profile information. The user profile view is automatically updated everytime the profile information changes in the underlying database.
-
The user profile information is synced with a remote Sync Gateway which then syncs it to other devices (subject to access control and routing configurations specified in the
sync function).
App Installation
Fetching App Source Code
To clone the project from GitHub, type the following command in your terminal:
git clone https://github.com/couchbase-examples/ios-swift-cblite-userprofile-syncInstalling Couchbase Lite XCFramework
Next, we will download the Couchbase Lite 3.0 XCFramework.
The Couchbase Lite iOS XCFramework is distributed via SPM, CocoaPods, Carthage, or you can download the pre-built framework. See the Getting Started - Install documentation for more information.
In our example, we will be downloading the pre-built version of the XCFramework, using a script. To do this, type the following in a command terminal replacing the path with the path on your computer:
  cd /path/to/cloned/repo/ios-swift-cblite-userprofile-sync/src

  sh install_tutorial.sh
Now, let's verify the installation.
Try it Out
- Open the
UserProfileSyncDemo.xcodeproj. The project would be located at/path/to/cloned/repo/ios-swift-cblite-userprofile-sync/src
open UserProfileSyncDemo.xcodeproj-
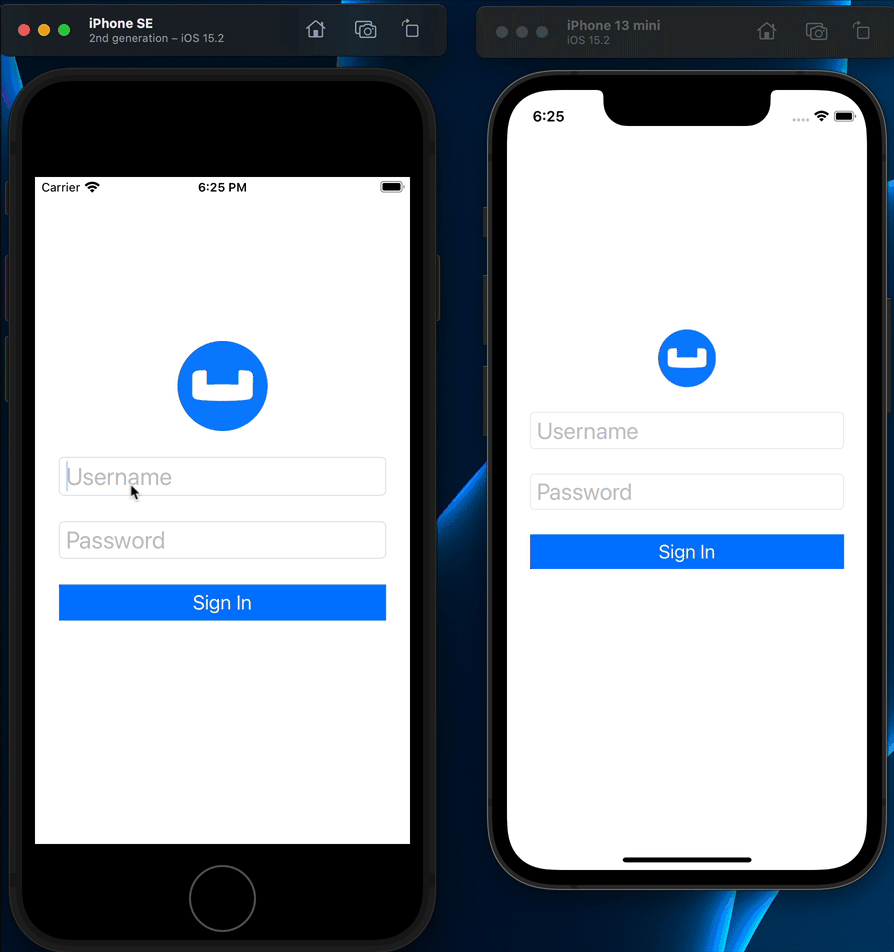
Build and run the project using two different simulators using Xcode
-
Verify that you see the login screen on both the simulators

Data Model
If you have followed along the tutorial Quickstart in Couchbase Lite Query with iOS, Swift, and UIKit, you can skip this section and proceed to the Backend Installation section as we have not made any changes to the Data model for this tutorial.
Couchbase Lite is a JSON Document Store. A Document is a logical collection of named fields and values.The values are any valid JSON types. In addition to the standard JSON types, Couchbase Lite supports some special types like Date and Blob.
While it is not required or enforced, it is a recommended practice to include a "type" property that can serve as a namespace for related.
The "User Profile" Document
The app deals with a single Document with a "type" property of "user". The document ID is of the form "user::<email>". An example of a document would be:
{
    "type":"user",
    "name":"Jane Doe",
    "email":"jame.doe@earth.org",
    "address":"101 Main Street",
    "image":CBLBlob (image/jpg),
    "university":"Rensselaer Polytechnic"
}
UserRecord
The "user" Document is encoded to a native struct named UserRecord.
let kUserRecordDocumentType = "user"
typealias ExtendedData = [[String:Any]]
struct UserRecord : CustomStringConvertible{
  let type = kUserRecordDocumentType
  var name:String?
  var email:String?
  var address:String?
  var imageData:Data?
  var university:String?
  var extended:ExtendedData? // future

  var description: String {
      return "name = \(String(describing: name)), email = \(String(describing: email)), address = \(String(describing: address)), imageData = \(imageData)"
  }
}
The "University" Document
The app comes bundled with a collection of Documents of type "university". Each Document represents a university.
{
    "type":"university","web_pages": [
      "http://www.rpi.edu/"
    ],
    "name": "Rensselaer Polytechnic Institute",
    "alpha_two_code": "US",
    "state-province": null,
    "domains": [
      "rpi.edu"
    ],
    "country": "United States"
}
UniversityRecord
The "university" Document is encoded to a native struct named UniversityRecord.
typealias Universities = [UniversityRecord]
// Native object
struct UniversityRecord : CustomStringConvertible{
  var alphaTwoCode:String?
  var country:String?
  var domains:[String]?
  var name:String?
  var webPages:[String]?

  var description: String {
      return "name = \(String(describing: name)), country = \(String(describing: country)), domains = \(String(describing: domains)), webPages = \(webPages), alphaTwoCode = \(String(describing: alphaTwoCode)) "
  }
}
Backend Installation
Prerequisites
In this step of the tutorial, we will be using docker and docker compose and should have both of these installed before continuing. Docker Desktop provides these tools and UI for Mac, Windows, and Linux.
You might also want a text editor outside XCode to review the docker and docker compose config files. Any text editor will work, but for many developers Visual Studio Code is a good solution as it provides extensions for Docker config file formatting and YAML support, which is a file format Docker Compose uses. You can download Visual Studio code here. If you are using Visual Studio code make sure you install the Docker extension. The YAML Language Support is another great extension that can be a major quality of life improvement if you use YAML files a lot.
NOTE: This part of the tutorial is longer than normal as there are several configuration files to review. For developers looking to try out the containers without reviewing the configuration files, you can skip to the [Try It Out - Docker Compose] (#try-docker-compose) section.
Review Setup of Docker Containers
Couchbase Server - Dockerfile
Docker and Docker Compose will be used to create a Couchbase Server container that has a one node cluster setup with a bucket, a user for sync gateway to perform replication between the sync gateway server and server, and indexes for the bucket.
This is accomplished by creating a custom Dockerfile that defines the Couchbase Server base image along with a shell scripts to perform the automation of the Couchbase Server cluster setup and importing of sample data.
- Open the Dockerfile found in the couchbase-server folder in the root of the repo in a text editor of your choice.
FROM couchbase/server:latest AS stage_base
COPY init-cbserver.sh /opt/couchbase/init/- The first line tells docker which docker container should be used as the
baseimage for this container. We are using thecouchbase:latestimage. As of Couchbase Server 7.1 - ARM64 and X86 images are provided. - Next it copies the init-cbserver.sh shell script into the containers /opt/couchbase/init folder
Automation using Shell Script
Next open the init-cbserver.sh file found in the same folder as the Dockerfile. This shell script is well documented with comments before each line, however we will still go through the script from a high level.
#!/bin/bash
# used to start couchbase server - can't get around this as docker compose
# only allows you to start one command - so we have to start couchbase like the Dockerfile would
# https://github.com/couchbase/docker/blob/master/enterprise/couchbase-server/7.1.1/Dockerfile#L88

/entrypoint.sh couchbase-server & - The first line starts couchbase server just like the standard docker file would. We need to do this because docker compose has a limit of only allowing one command/entrypoint to run per container. We need couchbase server to start before we can do our automated setup steps.
NOTE Sleep statements make sure that things complete before moving on to the next step. The 10-second delay is set after Couchbase Server is started to make sure the cluster is completely running before moving on to the next command. The delay is conservative and could be shortened based on the speed of your computer.
sleep 10s
/opt/couchbase/bin/couchbase-cli cluster-init -c 127.0.0.1 \
--cluster-username $COUCHBASE_ADMINISTRATOR_USERNAME \
--cluster-password $COUCHBASE_ADMINISTRATOR_PASSWORD \
--services data,index,query \
--cluster-ramsize $COUCHBASE_RAM_SIZE \
--cluster-index-ramsize $COUCHBASE_INDEX_RAM_SIZE \
--index-storage-setting default- The couchbase-cli tool is used to initialize the cluster and will set the administration username, password, and services along with the index configuration based on environment variables that are set in the docker compose file we will look at in a bit.
/opt/couchbase/bin/couchbase-cli bucket-create -c localhost:8091 \
--username $COUCHBASE_ADMINISTRATOR_USERNAME \
--password $COUCHBASE_ADMINISTRATOR_PASSWORD \
--bucket $COUCHBASE_BUCKET \
--bucket-ramsize $COUCHBASE_BUCKET_RAMSIZE \
--bucket-type couchbase - The couchbase-cli tool is used again, but this time to create a bucket bsaed on the environment variables that are set in the docker compose file
/opt/couchbase/bin/couchbase-cli user-manage \
--cluster http://127.0.0.1 \
--username $COUCHBASE_ADMINISTRATOR_USERNAME \
--password $COUCHBASE_ADMINISTRATOR_PASSWORD \
--set \
--rbac-username $COUCHBASE_RBAC_USERNAME \
--rbac-password $COUCHBASE_RBAC_PASSWORD \
--roles mobile_sync_gateway[*] \
--auth-domain local- The couchbase-cli tool is used to create a new user that can be used for sync gateway to connect to the server and replicate documents. The roles switch sets the role for sync gateway and the [*] defines that this user has access to all buckets for sync gateway. Note this could be a security risk in non-development environments and is set like this for sake of simplicity.
  /opt/couchbase/bin/curl -v http://localhost:8093/query/service \
  -u $COUCHBASE_ADMINISTRATOR_USERNAME:$COUCHBASE_ADMINISTRATOR_PASSWORD \
-d 'statement=CREATE INDEX idx_type on userprofile(type)'- The next command use the REST API to add an index in for queries that you could use in the web console Query in Couchbase Server. These aren't required for the mobile app or sync, but are nice to have when validating data.
Sync Gateway - Dockerfile
Now that we have reviewed how the Couchbase Server will be created, let's review how the Sync Gateway server will be created.
- Open the Dockerfile found in the sync-gateway folder in the root of the repo in a text editor of your choice.
FROM couchbase/sync-gateway:latest AS stage_base
COPY sync-gateway.json /etc/sync_gateway/config.json
COPY init-syncgateway.sh /opt/couchbase-sync-gateway/init/init-syncgateway.sh- The first line tells docker which docker container should be used as the
baseimage for this container. We are using thesync-gateway:latestimage. - Next it copies the sync-gateway.json config file into the containers /etc/sync_gateway folder and renames it to config.json which Sync Gateway reads in by default when starting.
- Finally, we need a script that will initialize Sync Gateway when the container starts.
Sync Gateway Config File Overview
The Sync Gateway server uses a configuration file when it starts to load in all important settings. In the demo app, this file is setup in Legacy Pre-3.0 Configuration for sake of simplicity. Let's review the configuration file by sections.
- Open the sync-gateway.json config file found in the same folder as the Dockerfile.
{
  "interface":":4984",
  "adminInterface":":4985",
   "log": ["*"],
  "logging": {
    "log_file_path": "/var/tmp/sglogs",
    "console": {
      "log_level": "debug",
      "log_keys": ["*"]
    },
    "error": {
      "enabled": true,
      "rotation": {
        "max_size": 20,
        "max_age": 180
      }
    },
    "warn": {
      "enabled": true,
      "rotation": {
        "max_size": 20,
        "max_age": 90
      }
    },
    "info": {
      "enabled": false
    },
    "debug": {
      "enabled": true
    }
  },
  "disable_persistent_config":true,
  "server_tls_skip_verify": true,
"use_tls_server": false,- interface and adminInterface are used to define which ports that Sync Gateway will run on. Note if you change the default values, you will also need to update your mobile app's replication configuration.
- log and logging set up the logging configuration.
- disable_persistent_config is required to run in Legacy Pre-3.0 Configuration mode
- server_tls_skip_verify is set to true because the Couchbase Server container is not using TLS in it's configuration. NOTE: DO NOT run with TLS disabled in production!
- use_tls_server is set to false so that the mobile app can communicate with the Sync Gateway server over HTTP instead of HTTPS. This is for the sake of simpliciy. NOTE: DO NOT run with TLS disabled in production!
Note: To use TLS with something like self-signed certificates would greatly increase the complexity and length of this tutorial. For this reason the tutorial shows the configuration without certificates.
"databases": {
    "userprofile": {
      "import_docs": true,
      "bucket":"userprofile",
      "server": "couchbase://couchbase-server",
      "enable_shared_bucket_access":true,
      "delta_sync": {
        "enabled":false
      },
       "num_index_replicas":0,
      "username": "admin",
      "password": "P@ssw0rd",
     "users": { "demo@example.com": { "password": "password"},
                "demo1@example.com": { "password": "password"},
                "demo2@example.com":{"password":"password" },
                "demo3@example.com":{"password":"password"},
                "demo4@example.com":{"password":"password"}
},- databases sets up the configuration for communication between Sync Gateway and Couchbase Server.
- userprofile is the configuration section for the userprofile bucket that Sync Gateway will be replicating.
- import_docs set to true allows Sync Gateway to import documents that exists on Couchbase Server.
- bucket is the name of the bucket that Sync Gateway will replicate with on Couchbase Server.
- server is the connection string to connect to the Couchbase Server. The name of the server is defined in the Docker Compose file and dockers internal DNS will handle name resolution to this hostname.
- enable_shared_bucket_access enables Mobile-Server Data Sync (a.ka. mobile convergence), which will generate the mobile-specific metadata for all the preexisting documents in the Couchbase Server bucket. You can learn more about this functionality in Syncing Mobile and Server documentation.
- delta_sync is an Enterprise Edition feature which requires a license. Delta Sync allows Sync Gateway to replicate only the parts of the Couchbase Mobile document that have changed.
- num_index_replicas determines the number of index replicas used when creating the core Sync Gateway indexes.
- username Sync Gateway uses to connect to the Couchbase Server. This username was created in the automation shell script step.
- password is the password that Sync Gateway will use to communicate with Couchbase Server.
- users is a hard coded collection of username, passwords and the role that the user is assigned to. Roles can be assigned to channels to which documents are assigned to in the sync process, restricting the documents that are replicated. Note that these username and passwords are the same username and passwords that are hard coded into the in the mobile app.
Sync Function
The sync section of the configuration is used to define custom business logic. The sync is a string value of Javascript code that will run every time a new document, revision, or deletion is added to a database. The sync function will examine the document and custom business logic can then calculate things like access control to limit which users can see which documents. The demo app is a simple example of custom business logic. See the Sync Function API and Access Control How-To guides for more detailed information and a listing of other API functions available.
function sync(doc, oldDoc) {
    console.log("********Procesing Doc. Is oldDoc == null? " + (oldDoc == null));

    /* Data Validation */
    // Validate the presence of email field.
    // This is the "username" <.>
    validateNotEmpty("email", doc.email);

    // Validate that the document Id _id is prefixed by owner <.>
    var expectedDocId = "user" + "::" + doc.email;
    if (expectedDocId != doc._id) {
      // reject document
      throw({forbidden: "user doc Id must be of form user::email"});
    }
   try {

       // Check if this is an import processing (done with admin credentials)
       requireAdmin();
       if (!isDelete()) {
           /* Routing */

           var username = getEmail();
           var channelId = "channel."+ username;

           channel(channelId);

           // Give user access to document
           access(username,channelId);
        }
    }catch (error) {
       console.log("This is not a doc import " + error);

       // If non admin client replication
       if (!isDelete()) {

         /* Authorization */
         // Verify the user making the request is the same as the one in doc's email
         requireUser(doc.email);

         // Check if document is being created / added for first time
         // We allow any user to create the document
         if (isCreate()) {
            /* Routing */
            // Add doc to the user's channel.
            var username = getEmail();
            var channelId = "channel."+ username;
            channel(channelId);

            // Give user access to document
            access(username, channelId);

          } else {
              // This is an update
              // Validate that the email hasn't changed.
              validateReadOnly("email", doc.email, oldDoc.email);
              // Add doc to the user's channel.
              var username = getEmail();
              var channelId = "channel."+ username;

              channel(channelId);

              // Give user access to document
              access(username,channelId);
          }
       }
    }
  // get type property
  function getType() {
    return (isDelete() ? oldDoc.type : doc.type);
  }

  // get email Id property
  function getEmail() {
    return (isDelete() ? oldDoc.email : doc.email);
  }

  // Check if document is being created/added for first time
  function isCreate() {
    // Checking false for the Admin UI to work
    return ((oldDoc == false) || (oldDoc == null || oldDoc._deleted) && !isDelete());
  }

  // Check if this is a document update
  function isUpdate() {
    return (!isCreate() && !isDelete());
  }

  // Check if this is a document delete
  function isDelete() {
    return (doc._deleted == true);
  }

  // Verify that specified property exists
  function validateNotEmpty(key, value) {
    if (!value) {
      throw({forbidden: key + " is not provided."});
    }
  }

  // Verify that specified property value has not changed during update
  function validateReadOnly(name, value, oldValue) {
    if (value != oldValue) {
      throw({forbidden: name + " is read-only."});
    }
  }
}- Locate the
// Authorizationsection of the Sync Function. You will see we are using the Sync functions <a
target="blank" rel="noopener noreferrer" href="https://developer.couchbase.com/documentation/mobile/2.0/guides/sync-gateway/sync-function-api-guide/index.html#requireuserusername">`requireUser()` API to verify that the email property specified in the Document matches the Id of the user making the request.
2. Data validation is done via the validateNotEmpy function by inspecting some of the contents of the document.
3. Verify that the email property is not null. If it's null, we throw a JS exception (see validateNotEmpty() function)
4. If this a new document, then verify that the Id of the Document is of the required format (i.e. **"user::<email>"_**). We throw an exception if that's not the case.
5. If this is a document update, then verify that the email property value has not changed. Again, we throw an exception if that's not the case.
Docker Compose YAML file
The docker-compose.yml file is provide to configure and build the Couchbase Server and Sync Gateway containers that we have reviewed.
- Open the docker-compose.yml found in the root of the repo in a text editor of your choice.
couchbase-server-ios-userprofile:
  build: ./src/couchbase-server
  ports:
    - 8091-8097:8091-8097
    - 9123:9123
    - 11207:11207
    - 11210:11210
    - 11280:11280
    - 18091-18097:18091-18097
  environment:
    - CLUSTER_NAME=couchbase-demo
    - COUCHBASE_ADMINISTRATOR_USERNAME=Administrator
    - COUCHBASE_ADMINISTRATOR_PASSWORD=P@ssw0rd12
    - COUCHBASE_BUCKET=userprofile
    - COUCHBASE_BUCKET_RAMSIZE=512
    - COUCHBASE_RBAC_USERNAME=admin
    - COUCHBASE_RBAC_PASSWORD=P@ssw0rd
    - COUCHBASE_RBAC_NAME=admin
    - COUCHBASE_RAM_SIZE=2048
    - COUCHBASE_INDEX_RAM_SIZE=512
  hostname: couchbase-server
  container_name: couchbase-server-ios-userprofile
  working_dir: /opt/couchbase
  stdin_open: true
  tty: true
  networks:
    - workshop
  entrypoint: [""]
command: sh -c "/opt/couchbase/init/init-cbserver.sh"- The couchbase-server-ios-userprofile section is used to define the couchbase server container.
- The build property defines what directory to look for the Dockerfile in
- The ports collection defines the ports that Couchbase Server requires to run
- The environment collection defines a set of environment variables that we use in our automation shell script to setup Couchbase Server
- The hostname defines what name should be used for DNS resolution
- The working directory will be used for all commands ran. We default this to /opt/couchbase since our automation script and data import file are located in this directory
- The network is set to workshop which will define a bridge or shared network that can be used to allow the Couchbase Server to communicate with the Sync Gateway server
- The entrypoint property is set to blank and overridden with a command since we want to run our custom automation script when the container is built.
sync-gateway-ios-userprofile:
    build: ./src/sync-gateway
    ports:
      - 4984-4986:4984-4986
    hostname: sync-gateway
    container_name: sync-gateway-ios-userprofile
    depends_on:
      - couchbase-server-ios-userprofile
    working_dir: /docker-syncgateway
    stdin_open: true
    tty: true
    networks:
      - workshop
    entrypoint: [""]
command: sh -c "/opt/couchbase-sync-gateway/init/init-syncgateway.sh"- The sync-gateway-ios-userprofile section is used to define the sync gateway server container.
- The build property defines what directory to look for the Dockerfile in
- The ports collection defines the ports that Sync Gateway requires to run
- The hostname defines what name should be used for DNS resolution
- The network is set to workshop which will define a bridge or shared network that can be used to allow the Couchbase Server to communicate with the Sync Gateway server
Finally, we define the network configuration and driver to use.
networks:
  workshop:
    driver: bridge
Try Docker Compose
Now that we have reviewed all the files that are used to create the containers, open a terminal window.
- Make sure you are in the root directory of the repo
- Run the docker-compose command
docker-compose up -d-
The docker containers should start downloading, then build, and finally start up
-
You can check the status of docker using either Docker Desktop or the terminal commands.
-
Docker Desktop Users should see a container listing after launching the app. The group name of the containers is the name of the directory of the code repo on your computer where you ran docker compose of. In the example it's named
ios-swift-cblite-userprofile-sync.

- Terminal users can use the docker-compose command to see the containers status
docker-compose ls

- To see individual containers you can use the docker command
docker container ls

Validation of Containers
-
Docker Desktop Users can select each container in Docker Desktop to get detained information and logs about the container running to validate the containers were built properly or use the terminal to gather information.
-
Docker Desktop Users - select the couchbase-server-ios-userprofile container. You should see logging information.
- Terminal users can enter the following command
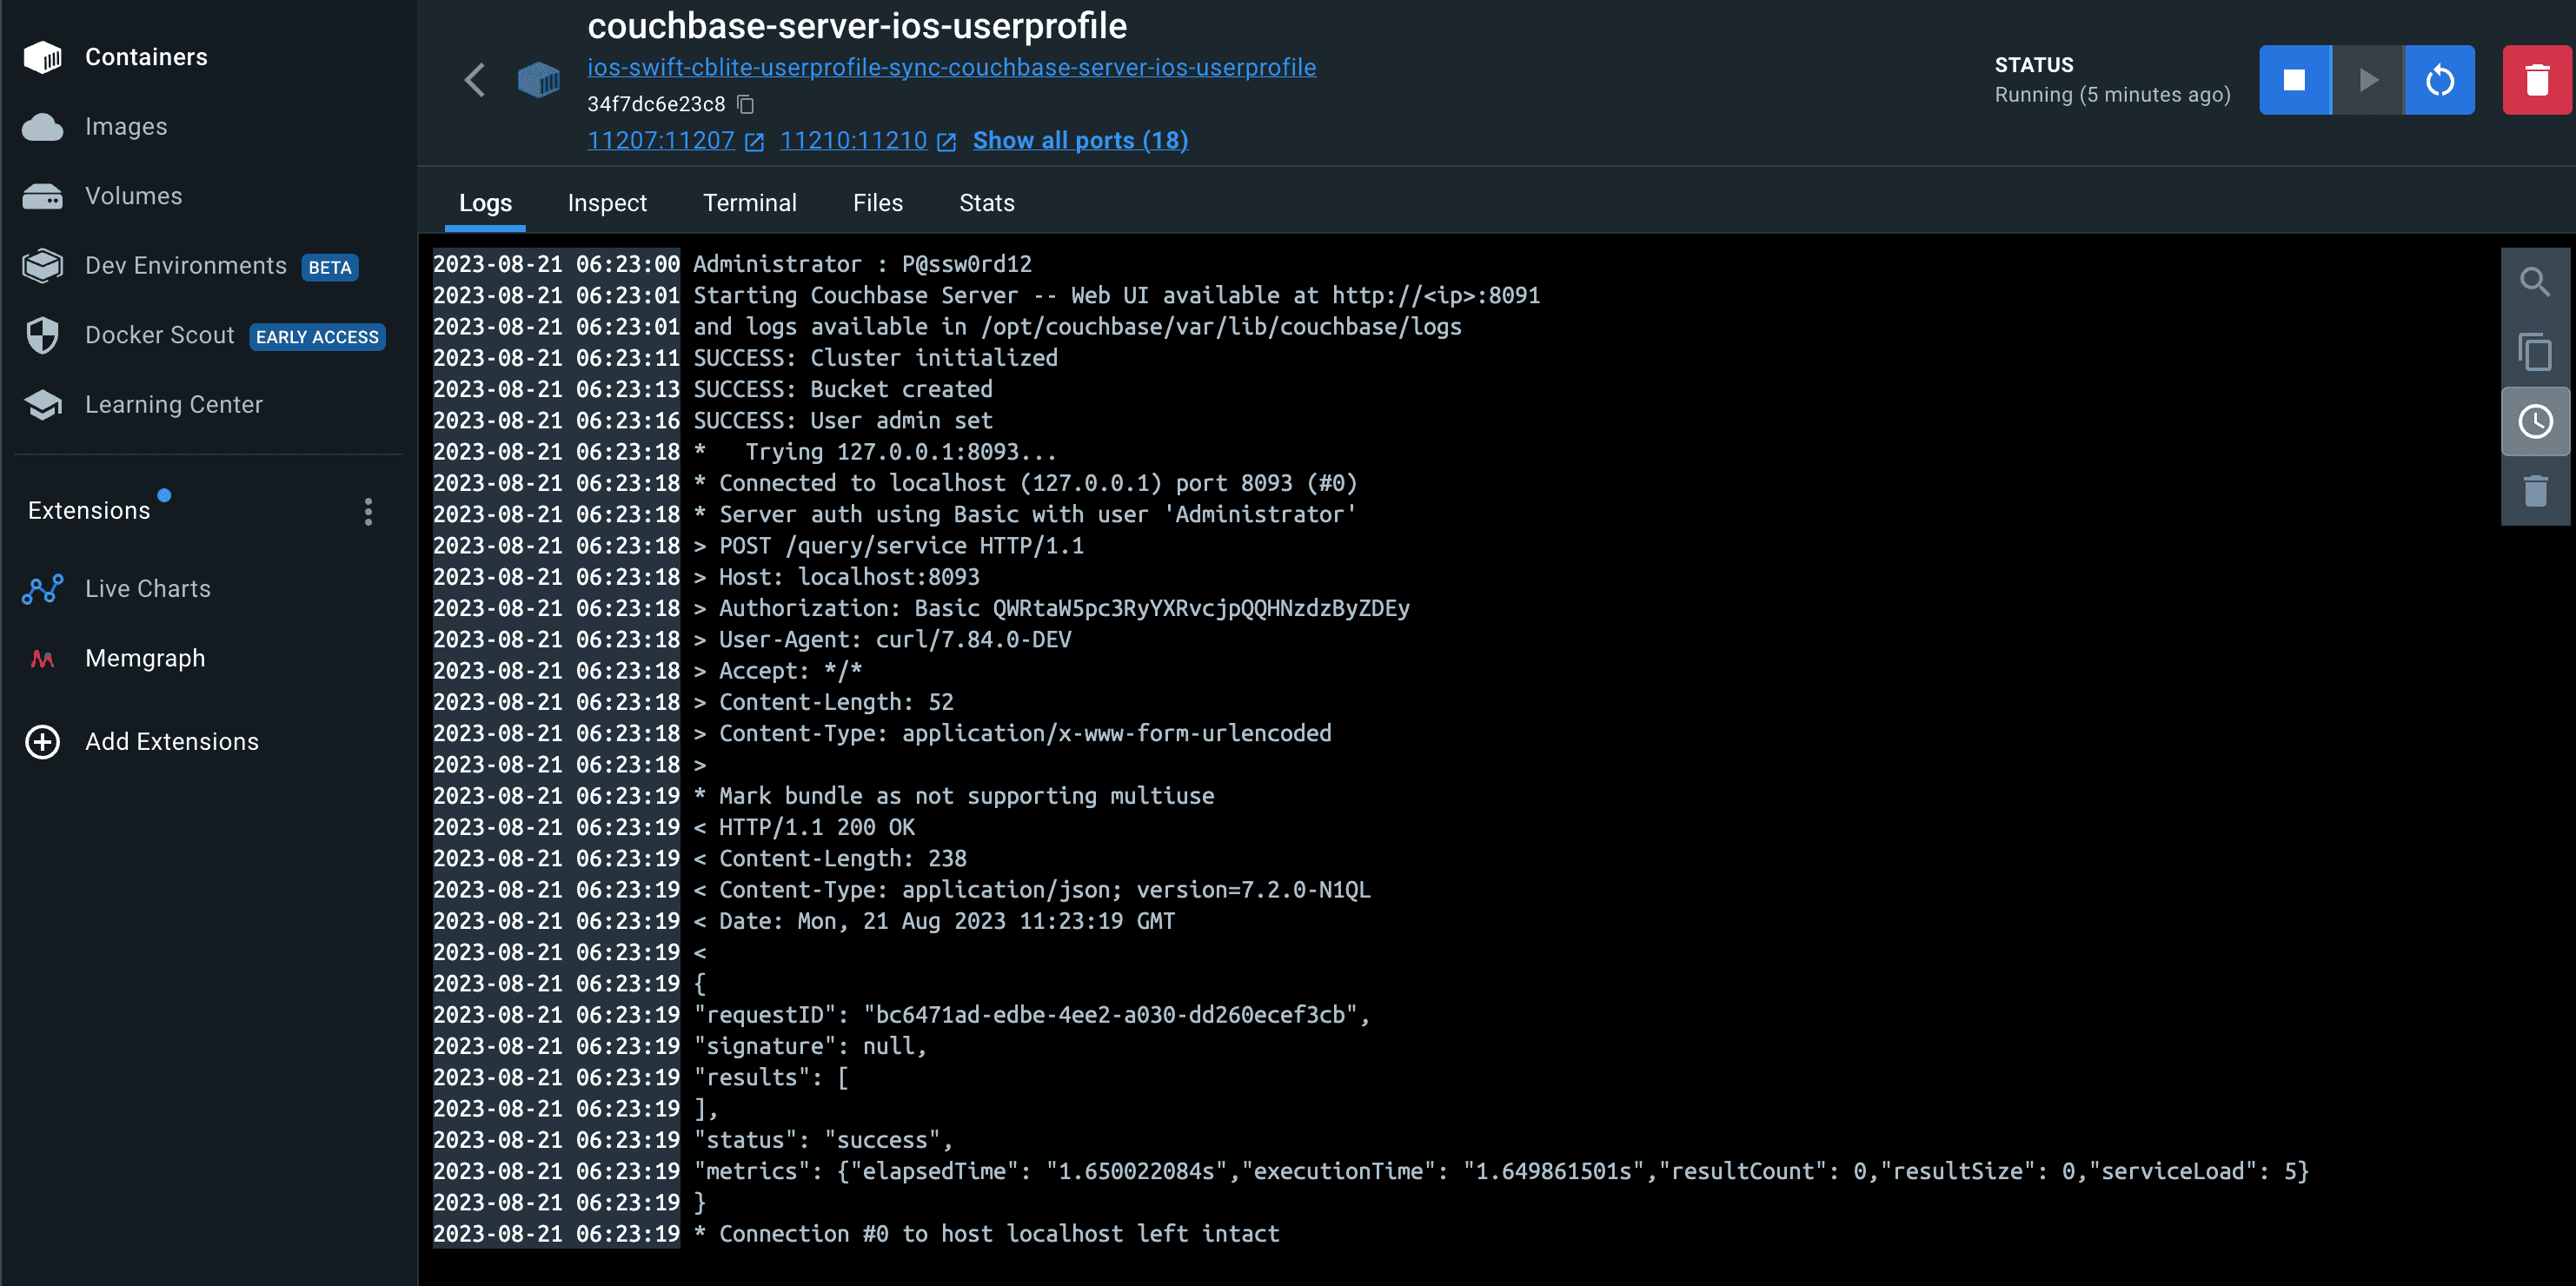
docker container logs couchbase-server-ios-userprofile- The logs should show the status of cluster initialization, bucket creation, and User admin. This will be followed by the results of the curl commands that create the index. When the setup is complete, you should see output similar to that shown below:
Administrator : P@ssw0rd12
Starting Couchbase Server -- Web UI available at http://<ip>:8091
and logs available in /opt/couchbase/var/lib/couchbase/logs
SUCCESS: Cluster initialized
SUCCESS: Bucket created
SUCCESS: User admin set
*   Trying 127.0.0.1:8093...
* Connected to localhost (127.0.0.1) port 8093 (#0)
* Server auth using Basic with user 'Administrator'
> POST /query/service HTTP/1.1
> Host: localhost:8093
> Authorization: Basic QWRtaW5pc3RyYXRvcjpQQHNzdzByZDEy
> User-Agent: curl/7.84.0-DEV
> Accept: */*
> Content-Length: 52
> Content-Type: application/x-www-form-urlencoded
>
* Mark bundle as not supporting multiuse
< HTTP/1.1 200 OK
< Content-Length: 238
< Content-Type: application/json; version=7.2.0-N1QL
< Date: Mon, 21 Aug 2023 11:23:19 GMT
<
{
"requestID": "bc6471ad-edbe-4ee2-a030-dd260ecef3cb",
"signature": null,
"results": [
],
"status": "success",
"metrics": {"elapsedTime": "1.650022084s","executionTime": "1.649861501s","resultCount": 0,"resultSize": 0,"serviceLoad": 5}
}
* Connection #0 to host localhost left intact- Docker Desktop Users - click the back button and now select the sync-gateway container. You should see logging information.
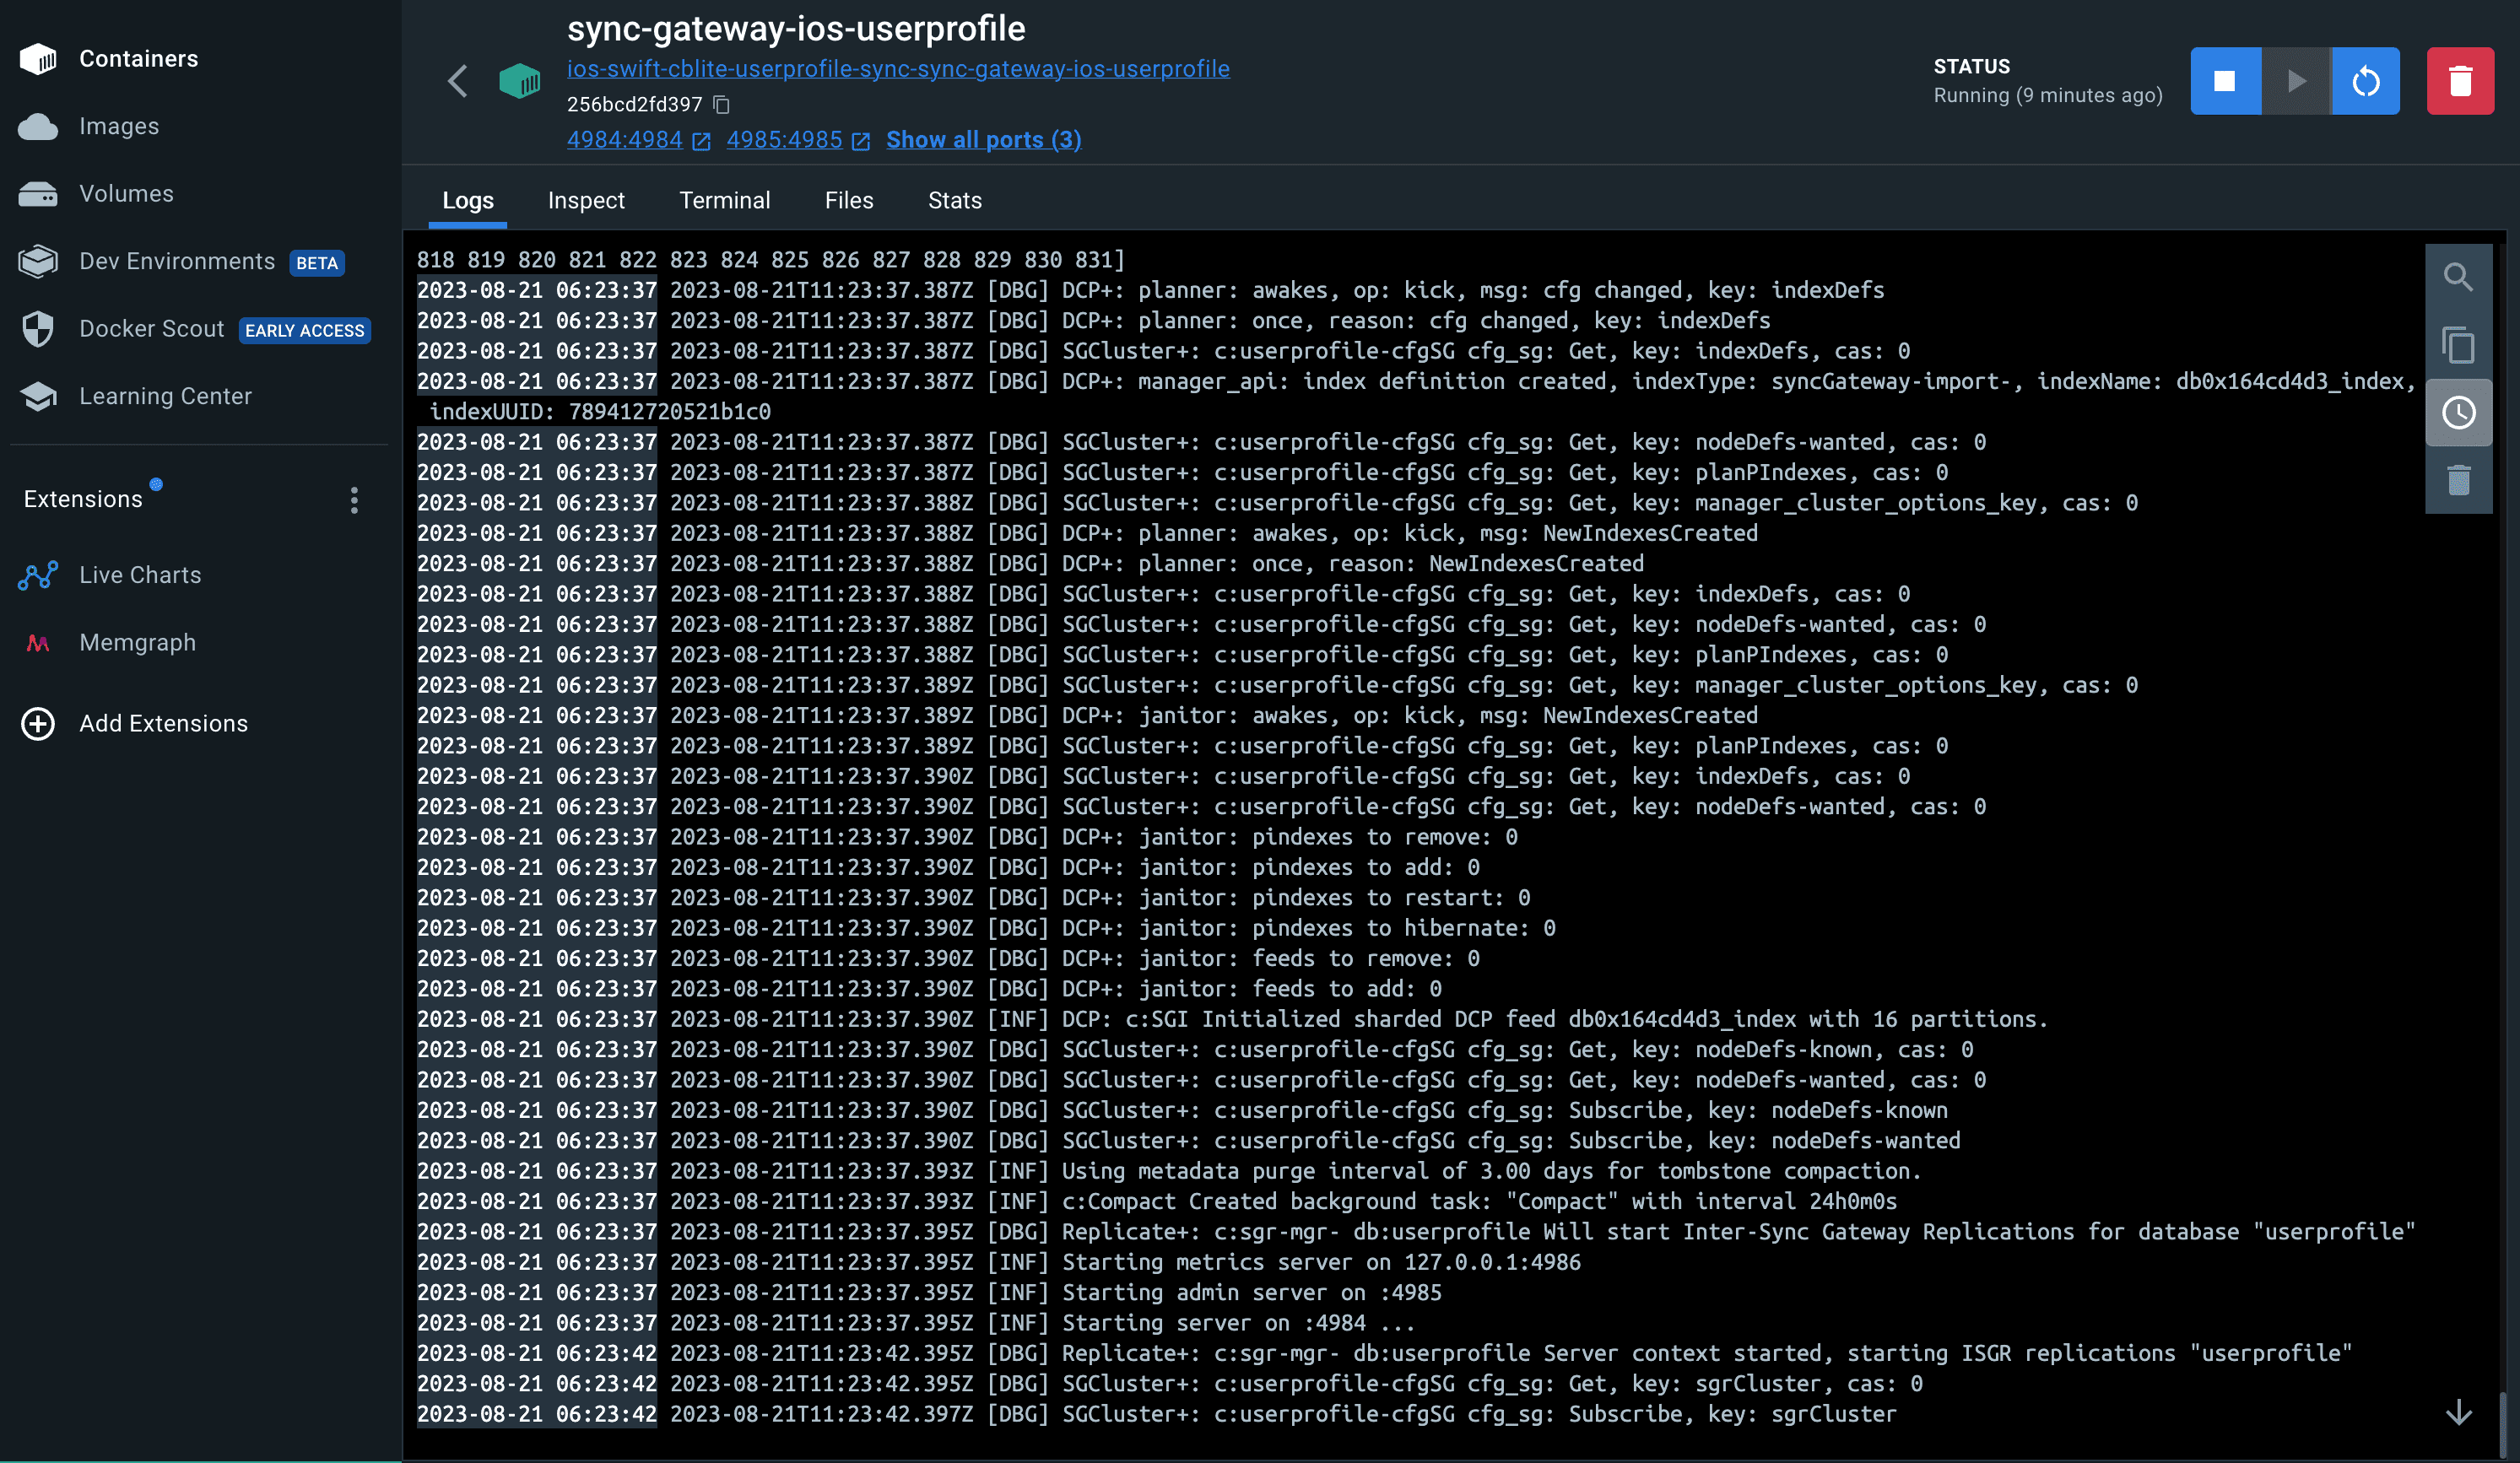
- Terminal users can enter the following command
docker container logs sync-gateway-ios-userprofileValidate Sync Gateway Server
To validate the Sync Gateway server we will use the REST API interface.
- Open up http://localhost:4984 in your web browser. You should see equivalent of the following message (your version of Sync Gateway might be newer than the text below):
{"couchdb":"Welcome","vendor":{"name":"Couchbase Sync Gateway","version":"3.0"},"version":"Couchbase Sync Gateway/3.0.0(541;46803d1) EE"}Starting Replication
Two-way Replication between the app and the Sync Gateway is enabled when user logs into the app.
To see the code behind this, open the project's DatabaseManager.swift file and locate the startPushAndPullReplicationForCurrentUser() function.
func startPushAndPullReplicationForCurrentUser() {In the function you will see we create an instance of the ReplicatorConfig, which specifies the source and target database. You could also use this to, optionally, override the default configuration settings.
let dbUrl = remoteUrl.appendingPathComponent(kDBName)
let config = ReplicatorConfiguration.init(database: db, target: URLEndpoint.init(url:dbUrl))

config.replicatorType = .pushAndPull
config.continuous =  true
config.authenticator =  BasicAuthenticator(username: user, password: password)

// This should match what is specified in the sync gateway config
// Only pull documents from this user's channel
let userChannel = "channel.\(user)"
config.channels = [userChannel]-
Initialize with
sourceas the local Couchbase Lite database and theremotetarget as the Sync Gateway -
Replication
typeofpushAndPullindicates that we require two-way sync. A value of.pullspecifies that we only pull data from the Sync Gateway. A value of.pushspecifies that we only push data. -
The
continuousmode is specified to be true which means that changes are synced in real-time. A value of false which implies that data is only pulled from the Sync Gateway. -
This is where you specify the authentication credentials of the user. In the Authorization section, we discussed that the Sync Gateway can enforce authorization check using the
requireUserAPI. -
The
channelsare used to specify the channels to pull from. Only documents belonging to the specified channels are synced. This is subject to Access Control rights enforced at the Sync Gateway. This means that if a client does not have access to documents in a channel, the documents will not be synched even if the client specifies it in the replicator configuration.
Now we initialize the Replicator with the ReplicatorConfiguration.
_pushPullRepl = Replicator.init(config: config)In order to follow the replicators progress, we can attach a callback listener to it.
Attaching a callback listener to the Replicator means we will be asynchronously notified of state changes.
This could be useful for instance, to inform the user of the progress of the replication. It is an optional step shown below.
_pushPullReplListener = _pushPullRepl?.addChangeListener({ (change) in
  let s = change.status
  switch s.activity {
    case .busy:
      print("Busy transferring data")
    case .connecting:
      print("Connecting to Sync Gateway")
    case .idle:
      print("Replicator in Idle state")
    case .offline:
      print("Replicator in offline state")
    case .stopped:
      print("Completed syncing documents")
  }
})
Now, with all that done, we can start the replicator.
_pushPullRepl?.start()Stopping Replication
When user logs out of the app, the replication is stopped before the database is closed.
- Open the DatabaseManager.swift file and locate the
stopAllReplicationForCurrentUser()function.
func stopAllReplicationForCurrentUser() {- Stop the replicator and remove any associated change listeners
if let pushPullReplListener = _pushPullReplListener{
  print(#function)
  _pushPullRepl?.removeChangeListener(withToken:  pushPullReplListener)
  _pushPullRepl = nil
  _pushPullReplListener = nil
}
_pushPullRepl?.stop()TIP: When you close a database, any active replicators, listeners and-or live queries are also be closed.
Query Events / Live Queries
Couchbase Lite applications can set up live queries in order to be asynchronously notified of changes to the database that affect the results of the query. This can be very useful, for instance, in keeping a UI View up-to-date with the results of a query.
In our app, the user profile view is kept up-to-date using a live query that fetches the user profile data used to populate the view. This means that, if the replicator pulls down changes to the user profile, they are automatically reflected in the view.
To see this:
- Open the UserPresenter.swift file and locate the
fetchRecordForCurrentUserWithLiveModeEnabled()function. Calling this function with a value oftrueimplies that the caller wishes to be notified of any changes to query results.
func fetchRecordForCurrentUserWithLiveModeEnabled(__ enabled:Bool = false) {- Build the Query using
QueryBuilderAPI. If you are unfamiliar with this API, please check out the Quickstart in Couchbase Lite Query with iOS, Swift, and UIKit tutorial.
guard let db = dbMgr.db else {
  fatalError("db is not initialized at this point!")
}
userQuery = QueryBuilder
  .select(SelectResult.all())
  .from(DataSource.database(db))
.where(Meta.id.equalTo(Expression.string(self.userProfileDocId)))Note: We query for documents based on document Id. In our app, there should be exactly one user profile document corresponding to this Id.
- Attach listener callback to the query to make it live.
userQueryToken = userQuery?.addChangeListener { [weak self] (change) in
  guard let `self`` = self else {return}
  switch change.error {
    case nil:
      var userRecord = UserRecord.init()
      userRecord.email = self.dbMgr.currentUserCredentials?.user

      for (_, row) in (change.results?.enumerated())! {
        if let userVal = row.dictionary(forKey: "userprofile") {
          userRecord.email  =  userVal.string(forKey: UserRecordDocumentKeys.email.rawValue)
          userRecord.address = userVal.string(forKey:UserRecordDocumentKeys.address.rawValue)
          userRecord.name =  userVal.string(forKey: UserRecordDocumentKeys.name.rawValue)
          userRecord.university = userVal.string(forKey: UserRecordDocumentKeys.university.rawValue)
          userRecord.imageData = userVal.blob(forKey:UserRecordDocumentKeys.image.rawValue)?.content
        }
}-
Attach a listener callback to the query. Attaching a listerner automatically makes it live so any time there is a change in the user profile data in the underlying database, the callback would be invoked
-
Create an instance of UserRecord. This will be populated with the query results.
-
The
SelectResult.all()method is used to query all the properties of a document. In this case, the document in the result is embedded in a dictionary where the key is the database name, which is "userprofile". So we retrieve the DictionaryObject at key "userprofile". -
We use appropriate type getters to retrieve values and populate the UserRecord instance
Exercises
Exercise 1
In this exercise, we will observe how changes made on one app are synced across to the other app
- The app should be running in two simulators side by side.
- Log into both the simulators with same userId and password. Use the values demo@example.com and password for user Id and password fields respectively.
- On one simulator, enter values in the user and address fields.
- Confirm that changes show up in the app on the other simulator.
- Similarly, make changes to the app in the other simulator and confirm that the changes are synced over to the first simulator.
Exercise 2
In this exercise, we will observe changes made via Sync Gateway are synced over to the apps
-
Make sure you have completed Exercise 1. This is to ensure that you have the appropriate user profile document (with document Id of "user::demo@example.com") created through the app and synced over to the Sync Gateway.
-
Open the command terminal and issue the following command to get the user profile document via link:[GET Document REST API] . We will be using
curlto issue the request. If you haven't done so, please install curl as indicated in the Prerequisites section.
curl -X GET http://localhost:4984/userprofile/user::demo@example.com --user demo@example.com- This GET retrieves the userprofile document with the id user::demo@example.com
- Your response should look something like the response below. The exact contents depends on the user profile information that you provided via your mobile app.
{
    "_attachments": {
        "blob_1": {
            "content_type": "image/jpeg",
            "digest": "sha1-S8asPSgzA+F+fp8/2DdIy4K+0U8=",
            "length": 14989,
            "revpos": 2,
            "stub": true
        }
    },
    "_id": "user::demo@example.com",
    "_rev": "2-3a76cfa911e2c54d1e82b29dbffc7f4e5a9bc265",
    "address": "",
    "email": "demo@example.com",
    "image": {
        "@type": "blob",
        "content_type": "image/jpeg",
        "digest": "sha1-S8asPSgzA+F+fp8/2DdIy4K+0U8=",
        "length": 14989
    },
    "name": "",
    "type": "user",
    "university": "British Institute in Paris, University of London"
}-
If you had updated an image via the mobile app, you should see an "_attachments" property. This entry holds an array of attachments corresponding to each image blob entry added by the mobile app. This property is added by the Sync Gateway when it processes the document. You can learn more about how image Blob types are mapped to attachments here.
-
Record the revision Id of the document. You will need this when you update the document
- In the command terminal, issue the following command to update the user profile document via PUT Document REST API.
NOTE: We chose to show how to update the address field via the REST API. You can choose to update any other profile information if you like. You will be prompted to enter the users password when you submit the curl command.
curl -X PUT \
  'http://localhost:4985/userprofile/user::demo@example.com?rev=3-12d203d6024c8b844c5ed736c726ac63379e05dc' \
  -H 'Accept: application/json' \
  -H 'Cache-Control: no-cache' \
  -H 'Content-Type: application/json' \
  -d '{
    "address": "101 Main Street",
    "email": "demo@example.com",
    "image": {
        "@type": "blob",
        "content_type": "image/jpeg",
        "digest": "sha1-S8asPSgzA+F+fp8/2DdIy4K+0U8=",
        "length": 14989
    },
    "name": "",
    "type": "user",
    "university": "British Institute in Paris, University of London"
}'
Here, in the PUT, we specify the:
- user id (
user::demo@example.com) - revision Id (from the previous step
3-033fcbaf269d65a9247067be76d664f1111d033b) to select the item we want to update
-
Confirm that you get a HTTP "201 Created" status code
-
As soon as you update the document via the Sync Gateway REST API, confirm that the changes show up in the mobile app on the simulator.

Handling Conflicts during Data Syncronization
Data conflicts are inevtiable in an environment where you can potentially have multiple writes updating the same data concurrently. Couchbase Mobile supports Automated Conflict Resolution.
You can learn more about automated conflict resolution in this blog Document Conflicts & Resolution.
Learn More
Congratulations on completing this tutorial!
This tutorial walked you through an example of how to use a Sync Gateway to synchronize data between Couchbase Lite enabled clients. We discussed how to configure your Sync Gateway to enforce relevant access control, authorization and data routing between Couchbase Lite enabled clients.
Check out the following links for further details.